Rabu, 27 Januari 2016

Android Developer Story: Travel app Wego, increases monthly user retention by 300% with material design

Posted by Lily Sheringham, Google Play team


Headquartered in Singapore, Wego is a popular online travel marketplace for flights and hotels for users in South East Asia and the Middle East. They launched their Android app in early 2014, and today, more than 62 percent of Wego app users are on Android. Wego recently redesigned their app using material design principles to provide their users a more native Android experience for consistency and easier navigation.


Watch Ross Veitch, co-founder and CEO, and the Wego team talk about how they increased monthly user retention by 300 percent and reduced uninstall rates by up to 25 percent with material design.


Learn more about material design, how to use Android Studio, and how to find success on Google Play with the new guide ‘Secrets to App Success on Google Play.’

Daftar Harga Laptop Samsung Terbaru April 2016

Harga Laptop Samsung - Daftar Harga Laptop Samsung Terbaru April 2016 - Laptop saat ini memang sudah menjadi kebutuhan yang sangat diperlukan untuk mempermudah perkerjaan manusia, dan komputer saat ini bahkan sudah menjadi suatu kewajiban yang dimiliki dalam setiap kantor, tentunya ini membuat para vendor laptop ataupun komputer berusaha untuk terus mengeluarkan produk terbaru laptopnya dengan berbagai fitur-fitur yang canggih, tentunya tidak lain dan tidak bukan untuk mempermudah aktifitas kita sehari-harinya.

Harga Laptop Samsung

Harga Laptop Samsung

Salah satu laptop yang sangat banyak dicari dengan adalah laptop samsung, Laptop samsung memang memiliki harga yang tergolong murah dibandingkan dengan spesifikasi yang akan diberikannya, jadi sobat tidak perlu khawatir lagi untuk ketangguhan dari laptop samsung, bukan hanya laptop saja, Saat ini juga samsung menjadi merk yang memiliki pasar smartphone yang sangat besar dan peminatnya di indoensia semakin banyak seiring dengan terobosan yang terus dikembangkan oleh pihak samsung.

Selain Harga Laptop Samsung yang cukup murah, spesifikasi laptop samsung juga cukup menawan, dengan produk yang high quality dan kita juga jarang mendengar kabar ketidaksukaan para user dalam menggunakan laptop samsung ini, dan yang cukup menarik dari laptop samsung adalah, desain pada laptop sangatlah menawan dan elegan, sehingga kita akan selalu merasa percaya diri membawa laptop samsung kemanapun. Nah bagi sobat yang tertarik dengan daftar harga laptop samsung terbaru ini, yukk langsung saja mari kita simak berikut.

Daftar Harga Laptop Samsung Terbaru

Samsung NP275E4V-K02IDAMD E1-1500 1.5GHz, Intel HD 4000, RAM 2GB, HDD 500GB 5400RPM, OS DOS.Rp 3.999.000
Samsung NP-N148Intel Atom, Ram 1 Gb DDR3, 1 x Slot SODIMM, 250GB HDD 5400rpm, Berat 1.24kg (2.73lbs), OS.Rp 3.265.325
Samsung Series 3 (NP370R4E-A01ID) TitanIntel Core i3 3110M – 2.4Ghz, VGA Intel HD 4000-729MB, RAM 4 GB DDR3, HDD 500GB, Layar 14″LED 1366 x 768, OS Windows 8Rp. 6.000.000
Samsung ATIV Book 9 Lite Touch NP915S3GIQuad-Core Processor (up to 1,4GHz) AMD A6-1450, AMD Radeon™ HD 8250 Graphics, 4GB DDR3L, Layar 13,3" LED Display with Touch Screen Panel, Windows 8. Rp 8.449.000
Samsung ATIV Book 2 NP270E4V – X01IDIntel Celeron 1007U, VGA nVidia GeForce 710M 1GB, RAM 2GB, HDD 500GB, Layar LED 14″ Multi-touch, OS DOSRp. 5.000.000
Samsung ATIV Smart PC XE500T1C – H01IDIntel Atom Z2760 1.8 GHz, VGA Intel, RAM 2GB, HDD 64 GB SSD, Layar HD 11.6″ Multi-touch, Sistem Operasi WIN 8Rp. 9.500.000

Baca Juga : 
Harga Laptop Samsung 2 Jutaan
Harga Laptop Samsung 3 Jutaan

Bisa dilihat diatas, Harga laptop samsung cukup bervarian baik itu harga 4 jutaan atapun harga 5 jutaan keatas, selain itu spesifikasi ram pada laptop samsung terbaru diatas juga cukup bertenaga, baik itu menggunakan Ram berukuran 2GB ataupun 4GB (Baca Juga: Harga Laptop Ram 4GB). Bukan hanya pada bagian performa saja, bagian processor juga cukup baik dan menggunakan laptop core i3 (Baca : Daftar Laptop Core i3), core i5, ataupun Core I7, yang pastinya akan memberikan pengalaman komputasi yang sangat menyenangkan.

Oke mungkin hanya sekian informasi harga laptop samsung yang dapat hargalaptop99 sampaikan, semoga bermanfaat dan semoga dapat menjadi referensi sobat untuk mencari laptop samsung murah berkualitas, Bagi sobat yang ingin menyimpan laptop samsung terbaru diatas, sobat dapat menekan tombol Ctrl + D untuk menyimpan, oke sekali lagi sekian dan terima kasih telah berkunjung di hargalaptop99 pada artikel Daftar Harga Laptop Samsung Terbaru.

Selasa, 26 Januari 2016

How Fabulous and Yummly grew with App Invites

Posted by Laurence Moroney, Developer Advocate


Introduced in May 2015, App Invites is an out-of-the-box solution for conducting app referrals and encouraging sharing. So far, we’ve seen very positive results on how the feature improves app discovery. While 52 percent of users discover apps by word of mouth, we have seen 92 percent of users trust recommendations from family and friends with App Invites. In this post, we’ll share some success stories from companies that have already used App Invites to grow their user base.


Fabulous is a research-based app incubated in Duke University's Center for Advanced Hindsight. The app helps users to embark on a journey to resetting poor habits, replacing them with healthy rituals, with the ultimate goal of improving health and well-being.


Users started taking advantage of App Invites within the app to share their experience with their friends and family. App Invites installs now account for 60 percent of all Fabulous installs via referrals. Sharing clicks also increased by 10 percent once App Invites were used. Fabulous also noticed increased user retention, with 2x the Life Time Value of the app for users that came in to it via App Invites. Fabulous simplified their user experience, combining SMS and email into a single interface, allowing users to focus on sharing.


Additionally, users that were acquired via App Invites versus other channels were found to be twice as likely to stay with the app.


CTO of Fabulous, Amine Laddhari, commented, “It took me only a few hours to implement App Invites versus several days of work when we built our own solution. It was straightforward!”


You can view the full case study from Fabulous here.


Yummly, a food discovery platform that views cooking a meal as a personalized, shareable experience wanted to expand its user base and generate awareness on the Android platform. It added App Invites so that users could recommend the app to their family and friends, giving functionality to share specific recipes, dinner ideas or shipping lists.


With App invites, they found that installation rates were about 60 percent higher compared to other sharing channels. Additionally, Yummly was able to take advantage of the seamless integration of Google Analytics. It’s the only share channel that has this integration, allowing data such as the number of invites sent, accepted and resulting installs to be accurately tracked.


Melissa Guyre, Product Manager at Yummly, commented, “The App Invites Integration process was seamless. A bonus feature is the excellent tracking tie-in with Google Analytics.”


You can view the full case study from Yummly here.


App Invites is available for Android or iOS, and you can learn how you can build it into your own apps at g.co/appinvites.

Senin, 25 Januari 2016

New features to better understand player behavior with Player Analytics

Posted by Lily Sheringham, Developer Marketing at Google Play


Google Play games services includes Player Analytics, a free reporting tool available in the Google Play Developer Console, to help you understand how players are progressing, spending, and churning. Now, you can see what Player Analytics looks like with an exemplary implementation of Play games services: try out the new sample game in the Google Play Developer Console, which we produced with help from Auxbrain, developer of Zombie Highway 2. The sample game uses randomized and anonymized data from a real game and will also let you try the new features we’re announcing today. Note: You need a Google Play Developer account in order to access the sample game.


Use predictive analytics to engage players before they might churn


To help you better understand your players’ behavior, we’ve extended the Player Stats API in Player Analytics with predictive functionality. The churn prediction method will return data on the probability that the player will churn, i.e., stop playing the game, so you can create content in response to this to entice them to stay in your game. Additionally, the spend prediction method will return the probability that the player will spend, and you could, for example, provide discounted in-app purchases or show ads based on these insights.


Create charts in the new funnels report to quickly visualize sequences of events


The funnels report enables you to create a funnel chart from any sequence events, such as achievements, spend, and custom events. For example, you could log custom events for each step in a tutorial flow (e.g., tutorial step 1, step 2, step 3), and then use the funnel report to visualize the exit points in your tutorial.


Measure and compare the effect of changes and cumulative values by new users with cohort’s report


The cohorts report allows you to take any event such as sessions, cumulative spend, and custom events, and compare the cumulative event values by new user cohorts - providing valuable insight into the impact of your decisions on your gaming model. For example, you can view users that started the day before you made a change and the day after. This allows you to measure and compare the effect of changes made, so if you doubled the price of all your items in your in-game store, you can see if the cumulative sessions started after the change was lower or higher than the users that started before the change.


Updated C++, iOS SDKs and Unity plug-in to support Player Stats API


We have updated the C++ and iOS SDKs, and the Unity plug-in, all of which now support the Player Stats API, which includes the basic player stats as well as spend and churn predictions.

Be sure to check out the sample game and learn more about Play Games Services. You can also get top tips from game developer Auxbrain to help you find success with Google Play game services.


Sabtu, 23 Januari 2016

Play Games Permissions are changing in 2016

Posted by Wolff Dobson, Developer Advocate


We’re taking steps to reduce sign-in friction and unnecessary permission requests for players by moving the Games APIs to a new model. The new interaction is:


  • Players are prompted to sign-in once per account, rather than once per game

  • Players no longer need their account upgraded to Google+ to use Play Games services

  • Once players have signed-in for the first time, they will no longer need to sign in to any future games; they will be automatically signed in

  • Note: Players can turn off auto-sign-in through the Play Games App’s settings


Advantages:


  • Once a user signs in for first time, new games will generally be able to sign in without any user interaction

  • There is no consent screen required for signing in on any particular game. Sign-in will be automatic to each new game.


In order to respect user’s privacy and avoid revealing their real name, we also have to change the way player IDs work.


  • For existing players: Games will continue to get their Google+ ID (also called “player ID” in previous documentation) when they sign in.

  • For new players: Games will get a new player ID which is not the same as the previous IDs we’ve used.


Potential issues


Most games should see no interruption or change in service. There are a handful of cases, however, where some change is required.


Below are some issues, along with potential solutions.


These are:


  1. Asking for the Google+ scope unnecessarily

    • Issue: Your users will get unnecessary, potentially disturbing pop-up consent windows
    • Solution: Don’t request any additional scopes unless you absolutely need them

  2. Using the Play Games player ID for other Google APIs that are not games

    • Issue: You will not get valid data back from these other endpoints.
    • Solution: Don’t use player ID for other Google APIs.

  3. Using mobile/client access tokens on the server

    • Issue: Your access token may not contain the information you’re looking for

      • ...and this is not recommended in the first place.

    • Solution: Use the new GetServerAuthCode API instead.


Let’s cover each of these issues in detail.


Issue: Asking for unnecessary scopes


Early versions of our samples and documentation created a GoogleApiClient as follows:


 // Don’t do it this way!  
GoogleApiClient gac = new GoogleApiClient.Builder(this, this, this)
.addApi(Games.API)
.addScope(Plus.SCOPE_PLUS_LOGIN) // The bad part
.build();
// Don’t do it this way!


In this case, the developer is specifically requesting the plus.login scope. If you ask for plus.login, your users will get a consent dialog.


Solution: Ask only for the scopes you need


Remove any unneeded scopes from your GoogleApiClient construction along with any APIs you no longer use.


 // This way you won’t get a consent screen  
GoogleApiClient gac = new GoogleApiClient.Builder(this, this, this)
.addApi(Games.API)
.build();
// This way you won’t get a consent screen


For Google+ users


If your app uses specific Google+ features, such as requiring access to the player’s real-world Google+ social graph, be aware that new users will still be required to have a G+ profile to use your game. (Existing users who have already signed in won’t be asked to re-consent).


To require Google+ accounts to use your game, change your Games.API declaration to the following:


 .addApi(Games.API, new GamesOptions.Builder()  
.setRequireGooglePlus(true).build())


This will ensure that your game continues to ask for the necessary permissions/scopes to continue using the player’s real-world social graph and real name profile.


Issue: Using the Player ID as another ID


If you call the Games.getCurrentPlayerId() API, the value returned here is the identifier that Games uses for this player.


Traditionally, this value could be passed into other APIs such as Plus.PeopleApi.load. In the new model, this is no longer the case. Player IDs are ONLY valid for use with Games APIs.


Solution - Don’t mix IDs


The Games APIs (those accessed from com.google.android.gms.games) all use the Player ID, and as long as you use only those, they are guaranteed to work with the new IDs.


Issue: Using mobile/client access tokens on the server


A common pattern we’ve seen is:


  • Use GoogleAuthUtil to obtain an access token

  • Send this token to a server

  • On the server, call Google to verify the authenticity. This is most commonly done by calling https://www.googleapis.com/oauth2/v1/tokeninfo and looking at the response


This is not recommended in the first place, and is even more not-recommended after the shift in scopes.


Reasons not to do this:


  • It requires your app to know the current account the user is using, which requires holding the GET_ACCOUNTS permission. On Android M, this will result in the user being asked to share their contacts with your app at runtime, which can be intimidating.

  • The tokeninfo endpoint isn’t really designed for this use case - it’s primarily designed as a debugging tool, not as a production API. This means that you may be rate limited in the future if you call this API.

  • The user_id returned by token info may no longer be present with the new model. And even if it is present, the value won’t be the same as the new player ID. (See problem 2 above)

  • The token could expire at any time (access token expiration times are not a guarantee).

  • Using client tokens on the server require extra validation checks to make sure the token is not granted to a different application.


Solution: Use the new GetServerAuthCode flow


Fortunately, the solution is known, and is basically the same as our server-side auth recommendations for web.


  1. Upgrade to the latest version of Google Play Services SDK - at least 8.4.87.

  2. Create a server client ID if you don’t already have one

    1. Go to the Google Developer Console, and select your project

    2. From the left nav, select API Manager, then select Credentials

    3. Select “New Credentials” and choose “OAuth Client ID”

    4. Select “Web Application” and name it something useful for your application

    5. The client id for this web application is now your server client id.

  3. In your game, connect your GoogleApiClient as normal.

  4. Once connected, call the following API:

    1. Games.getGamesServerAuthCode(googleApiClient, “your_server_client_id”)

    2. If you were using GoogleAuthUtil before, you were probably calling this on a background thread - in which case the code looks like this:


 // Good way  
{
GetServerAuthCodeResult result =
Games.getGamesServerAuthCode(gac, clientId).await();
if (result.isSuccess()) {
String authCode = result.getCode();
// Send code to server.
}
}
// Good way


  1. Send the auth code to your server, exactly the same as before.

  2. On your server, make an RPC to https://www.googleapis.com/oauth2/v4/token to exchange the auth code for an access token, probably using a Google Apis Client Library.

    1. You’ll have to provide the server client ID, server client secret (listed in the Developer Console when you created the server client ID), and the auth code.

    2. See more details here: https://developers.google.com/identity/protocols/OAuth2WebServer?utm_campaign=play games_discussion_permissions_012316&utm_source=anddev&utm_medium=blog#handlingresponse

    3. No, really:  You should use a Google Apis Client Library to make this process easier.

  3. Once you have the access token, you can now call www.googleapis.com/games/v1/applications/<app_id>/verify/ using that access token.

    1. Pass the auth token in a header as follows:

      1. “Authorization: OAuth <access_token>”

    2. The response value will contain the player ID for the user. This is the correct player ID to use for this user.

    3. This access token can be used to make additional server-to-server calls as needed.

Note: This API will only return a 200 if the access token was actually issued to your web app.


In summary


Let’s be very clear: If you do nothing, unless you are depending explicitly on Google+ features, you will see no change in functionality, and a smoother sign-in experience.


If you are:


  • Requesting Google+ scopes without using them, it’s a good idea to stop using them from here out.

  • Sending client access tokens to your server, we strongly suggest you use getGamesServerAuthCode() instead.


Thanks, and keep making awesome games!


Jumat, 22 Januari 2016

Daftar Hotmail / Cara Buat Akun Email Hotmail Indonesia Terbaru

Daftar hotmail atau cara membuat akun email hotmail  indonesia terbaru 2016 baik melalui hp android dan komputer pc  tidak jauh berbeda dengan proses membbuat email-email lainya seperti gmail atau juga yahoo indonesia yang jauh sudah begitu banyak di akses dan hotmail itu sendiri khususnya di indonesia sejauh ini masih bisa di bilang tidak terlalu banyak yang menggunakan padahal peranan dari email hotmail sesungguhnya sama saja artinya mempunyai kapasitas yang multi pungsi
 
E-mail hotmail atau bisa juga di jadikan sebagai akun id microsoft untuk mengoprasikan semua komponen program aplikasi yang terdapat di dalamnya baik di komputer dan mobile phone yang menggunakan os windows jelasnya bahwa hotmail itu sendiri banyak sekali kegunaanya 

Pada postingan sore ini saya kembali akan mengulas terkait bagaimana proses daftar hotmail/cara buat akun hotmail indonesia terbaru  melalui komputer dan hp android yang mana tujuanya dari panduan ini khusus bagi teman-teman yang barangkali saja masih belum tahu dan mengerti dalam hal cara registrasinya


*  Silahkan klik   Daftar Hotmail

Pada halaman perintah pertama klik Sign Up Now

Daftar Hotmail indonesia

*  NEXT  rubah terlebih dahulu bahasa menjadi ke bahasa Indonesia caranya geser halaman sampai bawah dan klik pada bagian English

Daftar Hotmail indonesia

*  NEXT lalu pilih Bahasa Indonesia dan klik Save

Daftar Hotmail indonesia


*  NEXT setelah  itu anda harap tentukan domainya dulu dan pada bagian ini silahkan pilih sendiri mau co.id atau mau menggunakan com sementara di sini saya beri contog dengan domain com

Daftar Hotmail indonesia

*  NEXT  Di halaman Daftar silahkan isi semua from kolom yang di sediakan seperti :

Nama depan dan nama belakang   >  masukan nama lengkap anda

Nama pengguna   >   di isi dengan nama depan anda sendiri tapi jangan lupa kasih akhiran angka atau apa saja contoh rickysf77

Sandi   >  buatlah kata sandi minimal 8 hurup    contoh F@smal1975

Masukan ulang kata sandi   >  masukan kembali kata sandi yang sama dengan yang sebelumnya tadi

Negara/kawasan  >  pilih indonesia

Tanggal lahir  >  untuk menetukan tanggal lahir anda hanya cukup klik tombol panel yang di lingkari

Jenis kelamin  >  begitu juga dalam menentukan jenis kelamin sama dengan di atas sebelumnya tadi


Daftar Hotmail indonesia

*  Lanjut  Kode negara  >  klik panel yang di lingkari lalu pilih indonesia

No telepon  >  isi dengan nomor hp anda yang masih aktif tanpa menyertakan angka nol

Alamat email alternatif  >  boleh di isi atau di kosongkan

Masukan karakter yang anda lihat  > masukan beberapa digit capta  ke dalam kolom di bawahya dan jangan lupa beri centang pada bagian kirimkan saya tawaran dari microsoft jika sudah selesai semua kolom i isi dengan baik dan benar klik Buat akun

Daftar Hotmail indonesia

* NEXT kemudian selanjutnya anda buka tab baru dan silahkan buka alamat email hotmail yang baru saja anda buat karena link verifikasi email hotmail  harus di buka untuk melakukan verifikasi klik pada link tersebut untuk lanjut masuk ke halaman profil utama


Daftar Hotmail indonesia


* NEXT Dan sekarang anda sudah bisa melihat halaman email hotmail yang artinya bahwa anda telah berhasil dalam melakukan proses daftar hotmail/cara buat akun hotmail indonesia terbaru

Daftar Hotmail indonesia

Dengan demikian selesai sudah panduan bagaimana cara membuat email hotmail baru tersebut tentunya email tersebut sudah bisa di gunakan untuk kepentingan atau keperluan apa saja termasuk untuk masuk ke sistem windows phone di hp atau komputer. selamat mencoba   !

Rabu, 20 Januari 2016

Android Developer Story: Music app developer DJIT builds higher quality experiences and successful businesses on Android

Posted by Lily Sheringham, Google Play team


Paris-based DJiT is the creator of edjing, one of the most downloaded DJ apps in the world, it now has more than 60 million downloads and a presence in 182 countries. Following their launch on Android, the platform became the largest contributor of business growth, with 50 percent of total revenue and more than 70 percent of new downloads coming from their Android users.


Hear from Jean-Baptiste Hironde, CEO & Co-founder, Séverine Payet, Marketing Manager, and Damien Delépine, Android Software Engineer, to learn how DJit improved latency on new Android Marshmallow, as well as leveraged other Android and Google Play features to create higher quality apps.


Find out more about building great audio apps and how to find success on Google Play.

Selasa, 19 Januari 2016

Cara Membuat Email Yahoo Lewat Aplikasi Mail Indonesia Di Android

Cara membuat email yahoo lewat aplikasi mail indonesia di android akan saya uraikan berikut di lengkapi dengan contoh gambar agat lebih mudah di pahami sekaligus di peraktekan karena berhubung sekarang ini segala aktifitas kita sudah hampir rata-rata menggunakan perangkat ponsel yang di dukung oleh sistem android jadi oleh karena itu saya kembali memberikan sedikit panduan bagaimana cara buat email yahoo baru lewat sebuah aplikasi kecil yang bisa anda download di play store.

Dan jika kita mendaftar akun yahoo melalui aplikasi tersebut jauh lebih praktis juga simpel artinya kapanpun dan di mana saja kita bisa dengan bebas manakala anda ingin buat alamat email yahoo indonesia baru tersebut saya rasa metode ini akan sangat membantu sekali bagi mereka yang belum memiliki perangkat laptop juga yang memiliki aktifitas super sibuk

Satu hal kelebihan dari cara daftar yahoo menggunakan aplikasi mail indonesia yaitu kita tidak harus mutar-mutar hanya untuk melakukan verifikasi email karena dengan secara otomatis kode verifikasi akan di kirimkan melalui sms ke ponsel android yang di gunakan untuk daftar yahoo mail indonesia tersebut.

Untuk lebih singkat serta jelasnya saya langsung saja lanjut ke proses cara pendaftaranya silahkan ikuti semua langkah yang saya berikan

*  Download aplikasi mail indonesia lewat google play store

*  Bila sudah selesai maka buka atau jalankan aplikasinya

*  Pada tampilan pertama klik Create Yahoo account

Cara membuat email yahoo indonesia


*  Pada halaman Daftar silahkan isi terlebih dahulu Nama depan dan belakang anda

*  Untuk menetukan Nama Pengguna Yahoo anda cukup klik tepat pada area kolom nama pengguna karena nantinya secara otomatis akan terbuka nama pengguna yang di berikan sesuai denga gabungan nama depan juga belakangg sobat. Dan jika anda ingin memilih nama pengguna yang lain cukup klik panel segi tiga kecil yang saya beri lingkaran kuning lihat contoh gambarnya di bawah

Cara membuat email yahoo indonesia

*  Pada kolo Kata sandi  >  Buatlah kata sandi minimal 6 hurup masukan secara manual saja

*  Selanjutnya masukan nomor ponsel yang ada dalam hp saat mendaftar yahoo tanpa di sertai angka nol

*  Pada kolom tanggal lahir masukan tanggal secara manual saja lalu untuk bulan klik panel segi tiga yang di lingkari dan untul mengisi kolom tahum ketik manual biasa saja

*  Lalu pilih gender atau jenis kelamin

*  Terakhir jika semua kolom sudah seleai di isi dengan baik dan benar maka klik Buat account perhatikan gambar di atas  yah

*  Selanjutnya klik Kirim SMS

Cara membuat email yahoo indonesia

*  Kemudian anda masukan kode verifikasi yang sudah di terima atau di kirimkan lewat sms ke dalam kotak yang di beri tanda panah lalu klik Kirim Kode

Cara membuat email yahoo indonesia

*  Setelah itu tunggu sebentar sehingga terbuka halaman dengan berisi pesan Selamat Account Anda berhasil dibuat dan pada perintah ini anda cukup klik Persiapan Awan saja

Cara membuat email yahoo indonesia


*  Langkah berikutnya yaitu anda akan di arahkan menuju halaman utama dari email yahoo dan di situ juga sobat akan langsung melihat kotak inbox  pesan email yang masuk

Cara membuat email yahoo indonesia

*  Dengan demikian selesai sudah proses cara membuat email yahoo lewat aplikasi mail indonesia di android dan email tersebut sudah bisa di gunakan untuk kepentingan apa saja seperti daftar bbm atau buat facebook serta yang lainya. semoga artikel ini dapat berguba dan membantu.

Tambahan apabila anda ingin ke luar dari email maka ikuti langkah-langkahnya di bawah ini

*  Klik Setting

Cara membuat email yahoo indonesia

*  Lalu klik Manage account

Cara membuat email yahoo indonesia

*  Selanjutnya klik Sign Out
Cara membuat email yahoo indonesia

Selamat mencoba...!Terimakasih atas waktu juga kesempatanya sudah berkenan mengunjungi www.caradaftarbuatakun.blogspot.com.

CARA MEMBUAT BLOG GRATIS | DAFTAR BLOGGER DI BLOGSPOT

Tags
Cara membuat blog gratis daftar blogger di blogspot bagi pemula pada dasarnya sangatlah mudah dan yang pasti tidak berbayar alias geratis, namun kendati begitu bukan berarti pula semudah membalikan telapak tangan artinya segala sesuatu apapun termasuk membuat blog di blogspot tersebut perlu yang namanya pengetahuan dasar guna di jadikan sebagai landasan serta reperensi. Sejauh apa yang dapat saya ketahui khususnya dalam hal pengetahuan sebagai dasar untuk bisa membuat blog di blogspot atau membuat blog di wordpress bahkan di host blog-blog lainya memang kita tidak harus di tungtut memiliki reputasi pendidikan formal yang tinggi atau keahlian khusus di bidang yang sedang saya bahas ini.

Intinya satu hal yang sangat penting untuk di jadikan dasar utamanya yaitu kita mau belajar dan membaca atau bertanya kepada orang yang memang lebih banyak memiliki pengetahua seputar hal itu,Kegiatan blogging dewasa ini sudah menjadi kegiatan atau aktifitas yang tidak menutup kemungkinan bisa mendapatakan penghasilan lebih sebagai sampaingan bahkan lebih dari itu.

Namun akan tetapi juga untuk membuat blog yang memang di tujukan untuk mengais rejeki di internet tentunya harus mengikuti berbagai aturan serta teknik khusus yang di berikan oleh kebijakan google adsen sekaligus syarat dengan memiliki pengetahuan tentang SEO dan pada kesempatan ini kebetulan saya sendiri tidak akan membahas soal ini mungkin insya allah di postingan selanjutnya akan saya sampaikan juga. sementara untuk kali ini saya hanya akan memberikan panduan tentang bagaimana cara membuat blog gratis daftar blogger di blogspot sebagai  bekal paling dasar untuk bisa bergabung di dunia google adsen atau mendapatkan uang dari internet.


Adapun yang menjadi syarat paling utama sekaligus wajib di miliki sebelum anda ada rencana untuk membuat blog yaitu anda harus mempunyai alamat email gmail atau akun google terlebih dahulu dan untuk caranya bisa anda pelajari di Daftar Gmail Indonesia

Baiklah saya lanjut saja ke pokok inti dari pembahasan materi pagi ini yaitu cara buat blog gratis di blogspot


*  Kunjungi situs resminya di  >>    Cara Buat Blog

*  Di halaman pertama masukan akun google anda atau alamat email google yang sudah di buat tadi sebelumnya dengan secara otomatis anda akan di arahkan menuju halaman untuk pendaftaran blog baru di blogspot

Cara membuat blog di blogspot

*  Klik Buat profil Google +

Cara membuat blog di blogspot
 * Pada perintah berikutnya masukan jenis kelamin anda lalu klik Tingkatkan di bagian bawah

Cara membuat blog di blogspot

*  Langkah seterusnya klik Tingkatkan

Cara membuat blog di blogspot

*  Kemudian di perintah halaman berikutnya cukup klik saja tombol Lanjutkan yang ada di bagian bawah halaman pendaftaran blog

Cara membuat blog di blogspot

*  Di bagian ikuti berbagai hal yang anda sukan cukup klik saja tombol Lanjutkan di bagian bawah halaman

Cara membuat blog di blogspot

*  Setelah itu klik Tetap Lanjutkan

Cara membuat blog di blogspot
*  Tahap berikutnya klik Selesai

Cara membuat blog di blogspot

*  Di perintah berikunya klik Lanjutkan ke Blogger

Cara membuat blog di blogspot

*  NEXT  setelah terbuka klik tombol Blog baru

Cara membuat blog di blogspot

*  NEXT pada halaman Daftar Blog buatlah judul blog sesuai dengan tema yang akan anda bahas pada blog tersebut dan untuk menentukan alamat blog silahkan buat URL blog anda kalau bisa saran saya harap sesuaikan url tersebut dengan judul blog yang mewakili kata kunci yang akan di target lalu klik tombol Buat Blog coba perhatikan contoh gambar di bawah ini

Cara membuat blog di blogspot

* Selanjutnya tunggu beberapa detik sampai terbuka halaman untuk pertama kali membuat postingan di blog anda dan klik Entri Baru

Cara membuat blog di blogspot


*  Kemudian langkah selanjutnya yaitu mengunggah template  caranya klik Cadagkan / Pulihkan di bagian pojok atas

Cara membuat blog di blogspot

*  Lalu klik tombol Browse

Cara membuat blog di blogspot


*  Dan carilah di mana letak tempat folder penyimpanan tempaltenya lalu klikpada area template setelah itu klik Open

Cara membuat blog di blogspot

*  Apabila templatenya sudah masuk maka klik saja Unggah

Cara membuat blog di blogspot

*  Kemudian kembali anda tunggu sampai proses unggah tempalte berhasil dan jika sudah sukses maka anda akan bisa melihat hasilnya seperti yang tampak pada contoh gambar berikut di bawah

Cara membuat blog di blogspot

Nah begitulah teman-teman panduan cara membuat blog gratis / daftar blogger di blogspot yang dapat saya sampaikan serta jelaskan kurang lebihnya semoga tutorial ini bisa bermanfaat juga berguna sekaligus membantu kawan-kawan khususnya bagi yang masig belum mengerti cara buat blog di blogspot.

Minggu, 17 Januari 2016

Update !! 5 Harga Laptop Murah Kualitas Bagus Terbaru 2016

Harga Laptop Murah - Update !! 5 Harga Laptop Murah Kualitas Bagus Terbaru 2016 - Banyaknya peminat laptop dengan harga murah di indonesia membuat banyak vendor-vendor laptop bersaing ketat dalam membuat laptop sesuai dengan keinginan masyarakat yaitu laptop murah dengan spesifikasi yang cukup baik, dan terbukti beberapa laptop dengan harga murah merupakan laptop yang cukup banyak pencarinya, salah satu laptop dengan harga termurah yang memiliki spesifikasi keren adalah Asus EEE PC, tapi laptop asus ini tidak kami masukkan kedaftar karena spesifikasinya tidak cukup baik, yah itu dikarenakan harganya berkisar antara 1-3 jutaan.

Laptop Murah Berkualitas memang cukup banyak digemari layaknya laptop gaming yang sangat laris dipasaran, tentunya dengan banyaknya pencari kita bisa melihat kebutuhan akan laptop semakin meningkat, Nah penasaran ingin melihat daftar harga laptop murah berkualitas ? yukk langsung saja mari kita simak berikut.

5 Harga Laptop Murah Kualitas Bagus

Harga Laptop Murah Kualitas Bagus

Tipe
Laptop
Spesifikasi
Harga Laptop
Asus X550DP-XX181D (Laptop Gaming)AMD Quad Core A8-5550M, AMD Radeon HD 8670M (Sun-XT) + AMD Radeon HD 8550, Ram 2GB, HDD 500GB.Rp 4.699.000
Asus A451LB-WX076DIntel Core i3 4010UM, Nvidia Geforce GT 740 2 GB, HDD 500 GB, Ram 4GB, Layar 14 Inci.Rp 5.099.000
HP Notebook 14-d010AUAMD Dual-Core Processor E1-2100 1 GHz, Cache 1MB, AMD Radeon HD 8210G,  Ram 2gb, HDD 320.Rp. 3.349.000
HP Notebook 1000-1431TUProcessor Intel Core i3-3110M 2.4GHz (cache 3Mb), VGA Intel HD Graphics 4000, RAM 2GB DDR3, HDD 500GB, Windows.Rp. 4.700.000
Asus Vivobook s200eAsus Vivobook s200eProcessor Intel Core i3 3217U, 4GB DDR3, HDD 500GB, Layar 11.6 inci, Windows 8.Rp ----


Halaman : [1]  [2]  [3]

Harga Laptop Murah Berkualitas diatas dapat sewaktu-waktu berubah sesuai dengan kondisi dan daerah tmpat tinggal anda, tapi jangan khawatir harga laptop diatas tidak jauh berbeda dengan daerah tempat tinggal anda.

Hanya sekian Daftar Harga Laptop Murah Berkualitas yang bisa kami berikan, Semoga bermanfaat buat anda, Jika anda ingin menyimpan daftar harga laptop diatas anda bisa menekan tombol Ctrl + D untuk membookmark Halaman Website ini.

Update !! 5 Daftar Harga Laptop Murah Berkualitas Terbaru 2016

Laptop Murah Berkualitas - Update !! 5 Daftar Harga Laptop Murah Berkualitas Terbaru 2016 - Laptop Dengan Harga Murah memang menjadi incaran banyak orang, bagaimana tidak dengan harga 2-4 jutaan kita sudah bisa memiliki laptop dengan dukungan spesifikasi yang cukup bagus untuk digunakan bahkan untuk digunakan bermain game pun bisa, tentunya ini sangat menarik perhatian banyak orang untuk memiliki laptop-laptop murah berkualitas, tapi perlu sobat ingat walaupun harga dan spesifikasinya yang cukup menarik pastinya selalu ada kekurangan dan kelebihan yang dimilikinya, tapi tak usah khawatir laptop dengan harga murah berkualitas ini cukup ampuh untuk menemani sobat dalam keseharian.

Nah Salah satu laptop murah berkualitas yang menurut admin cukup keren dan akhir-akhir ini sedang banyak yang mencarinya adalah laptop Asus X200MA, laptop asus ini memang cukup handal dan memiliki spesifikasi yang juga cukup untuk menjalankan berbagai macam aplikasi yang sesuai dengan spesifikasinya, dengan harganya 3 jutaan tapi spesifikasinya seperti Ram 2GB dan Harddisk 500Gb sudah cukup sempurna untuk membatu sobat mengerjakan berbagai PR yang ada.

Nah yang spesial adalah Laptop Acer Aspire E1 422G 45002G75Mn, laptop ini lebih dikenal dengan laptop Gaming dengan harga yang sangat murah sekitar 5 jutaan, tentunya untuk ukuran laptop gaming laptop ini sudah cukup murah dibanding dengan laptop gaming lainnya yang memiliki harga puluhan juta. Jika dilihat spesifikasinya memang cukup gahar dengan Ram 2GB + HDD 750 GB Serta AMD Radeon HD8670 1 GB yang akan membuat anda lebih nyaman bermain game. Oke langsung saja berikut Update 5 Daftar Harga Laptop Murah Berkualitas Terbaru.

Daftar Harga Laptop Murah Berkualitas

Laptop Murah Berkualitas

Tipe
Laptop
Spesifikasi
Harga Laptop
Asus X200MAProcessor Intel Celeron N2840 (up to 2.58GHz, 1M cache), 2 GB DDR3, 500 GB, Intel® HD Graphics, Windows 8.Rp. 3.050.000
Asus X454WAAMD Dual Core E1-6010 (1.35 GHz, 1M cache), 2 GB DDR3L, 500 GB, AMD Radeon R2, Windows 8.Rp. 3.499.000
Asus X453MAIntel® Celeron® Processor N2840 (2.16 GHz, 1M Cache) up to 2.58 GHz, 2 GB DDR3, 500 GB, Intel® HD Graphics, Windows.Rp. 3.649.000
Acer Aspire One Z140Processor Intel N2840, 2 GB, HDD 320 GB, Layar 14 Inci ,Windows 8.1.Rp 3.730.000
Acer Aspire E1 422G 45002G75MnProcessor AMD A4 5000, Vga AMD Radeon HD8670 1 GB, Ram 2Gb DDR3, HDD 750Gb, Layar 14 Inci, Windows 8.Rp 4.950.000

Halaman : [1]  [2]  [3]

Jumat, 15 Januari 2016

Create promo codes for your apps and in-app products in the Google Play Developer Console

Posted by Yoshi Tamura, Product Manager, Google Play


Over the past six months, a number of new tools in the Google Play Developer Console have been added to help you grow your app or game business on Google Play. Our improved beta testing features help you gather more feedback and fix issues. Store Listing Experiments let you run A/B tests on your app’s Play Store listing. Universal App Campaigns and the User Acquisition performance report help you grow your audience and better understand your marketing.


Starting today, you can now generate and distribute promo codes to current and new users on Google Play to drive engagement. Under the Promotions tab in the Developer Console, you can set up promo codes for your apps, games, and in-app products to distribute in your own marketing campaigns (up to 500 codes per app, per quarter). Consider using promo codes to reward loyal users and attract new customers.


How to use promo codes


  1. Choose your app in the Developer Console.
  2. Under the Promotions tab choose Add new promotion.

  3. Review and accept the additional terms of service if you haven’t run a promotion before.
  4. Choose from the options available, then generate and download your promo codes.
  5. Distribute your promo codes via your marketing channels such as social networks, in email, on the web, to your app’s beta testers, or in your app or game itself.
  6. Users can redeem your promo codes in a number of ways, including:


  1. From Google Play, using the Redeem menu option.
  2. From your app. They’ll be directed to the Play checkout flow before being redirected back to your app.
  3. By following a link that embeds the promo code (see tips below).


For more details about running a promotion for your app or game, read this article on the Google Play Developer Help Center.


Tips for making the most of promo codes


Some things to keep in mind when running a successful promotion:


  • There’s a limit of 500 promo codes per app every quarter.

  • You can embed your code in a URL so that users don’t have to enter it themselves (for example, if you’re sending your codes in an email). You can use the URL: https://play.google.com/redeem?code={CODE} (where {CODE} is a generated promo code).

  • To use promo codes for in-app products, you should implement In-app Promotions in your app. Note that promo codes can’t be used for subscriptions.

  • Review and adhere to the Promotional Code Terms Of Service.


We hope you find interesting ways to use promo codes to find new users and engage existing fans. To learn more about the many tools and best practices you can use to grow your business on Google Play, download our new developer playbook, “The Secrets to App Success on Google Play”.


Kamis, 14 Januari 2016

Using Google Sign-In with your server

Posted by Laurence Moroney, Developer Advocate


This is the third part in a blog series on using Google Sign-In on Android, and how you can take advantage of world-class security in your Android apps. In part 1, we spoke about the user experience improvements that are available to you. In part 2, we then took a deeper dive into the client-side changes to the Google Sign-In APIs that make coding a lot simpler.


In this post, we will demonstrate how you can use Google Sign-In with your backend. By doing so, users signing in on their device can be securely authenticated to access their data on your backend servers.


Using Credentials on your server


First, let’s take a look at what happens if a user signs in on your app, but they also need to authenticate for access to your back-end server. Consider this scenario: You’ve built an app that delivers food to users at their location. They sign into your app, and your app gets their identity. You store their address and order preferences in a database on your server.


Unless your server endpoints are protected with some authentication mechanism, attackers could read and write to your user database by simply guessing the email addresses of your users.


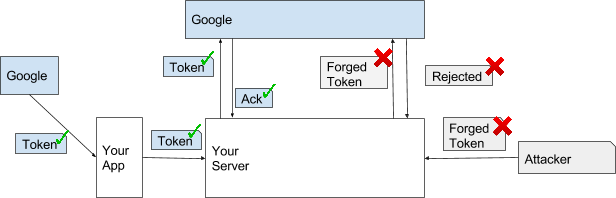
Figure 1. An attacker could submit a fake request to your server with an email address


This isn’t just a bad user experience, it’s a risk that customer data can be stolen and misused. You can prevent this by getting a token from Google when the user signs in to the app, and then passing this token to your server. Your server would then validate that this token really was issued by Google, to the desired user, and intended for your app (based on your audience setting, see below). At this point your server can know that it really is your user making the call, and not a nefarious attacker. It can then respond with the required details.


Figure 2. Attacker’s Forged Tokens will be rejected


Let’s take a look at the steps for doing this:


Step 1: Your Android app gets an ID token (*) after signing in with Google. There’s a great sample that demonstrates this here. To do this, the requestIdToken method is called when creating the GoogleSignInOptions object.


 GoogleSignInOptions gso = new GoogleSignInOptions.Builder(GoogleSignInOptions.DEFAULT_SIGN_IN)  
.requestIdToken(getString(R.string.server_client_id))
.requestEmail()
.build();


This requires you to get a client ID for your server. Details on how to obtain this are available here (see Step 4).


Once your Android app has the token, it can POST it over HTTPS to your server, which will then try to validate it.


(*) An ID token is represented using JSON Web Token, as defined by RFC7519 and the OpenID Connect spec. These are an open, industry standard method for representing claims securely between two parties.


Step 2: Your Server receives the token from your Android client. It should then validate the token with methods that are provided in the Google API Client libraries, in particular, verifying that it was issued by Google and that the intended audience is your server.


Your server can use the GoogleIdTokenVerifier class to verify the token and then extract the required identity data. The ‘sub’ field (available from the getSubject() method) provides a stable string identifier that should be used to identify your users even if their email address changes, and key them in your database. Other ID token fields are available, including the name, email address and photo URL. Here’s an example of a servlet that was tested on Google App Engine that can verify tokens using a provided library. These libraries allow you to verify the token locally without a network call for every verification.


 GoogleIdTokenVerifier verifier = new GoogleIdTokenVerifier.Builder(transport, jsonFactory)  
// Here is where the audience is set -- checking that it really is your server
// based on your Server’s Client ID
.setAudience(Arrays.asList(ENTER_YOUR_SERVER_CLIENT_ID_HERE))
// Here is where we verify that Google issued the token
.setIssuer("https://accounts.google.com").build();
GoogleIdToken idToken = verifier.verify(idTokenString);
if (idToken != null) {
Payload payload = idToken.getPayload();
String userId = payload.getSubject();
// You can also access the following properties of the payload in order
// for other attributes of the user. Note that these fields are only
// available if the user has granted the 'profile' and 'email' OAuth
// scopes when requested. (e.g. you configure GoogleSignInOptions like
// the sample code above and got a successful GoogleSignInResult)
// Note that some fields may still be null.
String email = payload.getEmail();
boolean emailVerified = Boolean.valueOf(payload.getEmailVerified());
String name = (String) payload.get("name");
String pictureUrl = (String) payload.get("picture");
String locale = (String) payload.get("locale");
String familyName = (String) payload.get("family_name");
String givenName = (String) payload.get("given_name");


Note that if you have an existing app using GoogleAuthUtil to get a token to pass to your backend, you should switch to the latest ID token validation libraries and mechanisms described above. We’ll describe recommendations for server-side best practices in a future post.


This post demonstrates how to use authentication technologies to ensure your user is who they claim they are. In the next post, we’ll cover using the Google Sign-In API for authorization, so that users can, for example, access Google services such as Google Drive from within your app and backend service.


You can learn more about authentication technologies from Google at the Google Identity Platform developers site.

Rabu, 13 Januari 2016

Spatial audio comes to the Cardboard SDK

Originally posted on Google Developers Blog


Posted by Nathan Martz, Product Manager, Google Cardboard


Human beings experience sound in all directions—like when a fire truck zooms by, or when an airplane is overhead. Starting today, the Cardboard SDKs for Unity and Android support spatial audio, so you can create equally immersive audio experiences in your virtual reality (VR) apps. All your users need is their smartphone, a regular pair of headphones, and a Google Cardboard viewer.


Sound the way you hear it


Many apps create simple versions of spatial audio—by playing sounds from the left and right in separate speakers. But with today’s SDK updates, your app can produce sound the same way humans actually hear it. For example:


  • The SDK combines the physiology of a listener’s head with the positions of virtual sound sources to determine what users hear. For example: sounds that come from the right will reach a user’s left ear with a slight delay, and with fewer high frequency elements (which are normally dampened by the skull).

  • The SDK lets you specify the size and material of your virtual environment, both of which contribute to the quality of a given sound. So you can make a conversation in a tight spaceship sound very different than one in a large, underground (and still virtual) cave.


Optimized for today’s smartphones


We built today’s updates with performance in mind, so adding spatial audio to your app has minimal impact on the primary CPU (where your app does most of its work). We achieve these results in a couple of ways:


  • The SDK is optimized for mobile CPUs (e.g. SIMD instructions) and actually computes the audio in real-time on a separate thread, so most of the processing takes place outside of the primary CPU.

  • The SDK allows you to control the fidelity of each sound. As a result, you can allocate more processing power to critical sounds, while de-emphasizing others.


Simple, native integrations


It’s really easy to get started with the SDK’s new audio features. Unity developers will find a comprehensive set of components for creating soundscapes on Android, iOS, Windows and OS X. And native Android developers will now have a simple Java API for simulating virtual sounds and environments.


Experience spatial audio in our sample app for developers


Check out our Android sample app (for developer reference only), browse the documentation on the Cardboard developers site, and start experimenting with spatial audio today. We’re excited to see (and hear) the new experiences you’ll create!

Minggu, 10 Januari 2016

10 Daftar Harga Laptop Ram 4GB Termurah April 2016

Harga Laptop Ram 4GB - 10 Daftar Harga Laptop Ram 4GB Termurah April 2016 - Laptop saat ini memang sudah menjadi kebutuhan hidup sebagian besar orang yang berkerja, dengan laptop berbagai kegiatan dapat dengan mudah dikerjakan tanpa harus membawa bobot yang super berat seperti komputer yang memang hanya digunakan untuk dirumah saja. Tentunya, agar perkerjaan bisa dengan lancar dan mudah dilakukan, pastinya spesifikasi laptop akan sangat berpengaruh terhadapt kinerja yang didapatkan.

Walaupun saat ini sudah banyak laptop berukuran Ram 2Gb dengan harga yang cukup murah, tapi pastinya kinerja yang didapatkan hanya pas-pasan, apalagi sobat harus membuka banyak program secara sekaligus, pastinya laptop akan menjadi lemot ataupun heng, cara terbaik untuk mendapatkan kinerja laptop yang bagus adalah, dengan menggunakan Ram berukuran 4GB, walaupun harga laptop ram 4gb lebih mahal dibanding dengan ram 2gb, tapi pastinya sobat akan lebih leluasa dan performa laptop akan terasa lebih cepat.

Nah bagi sobat yang penasaran ingin melihaT laptop ram 4gb ini, tenang saja, karena kami sudah mengambil beberapa informasi mengenai harga laptop ram 4gb termurah dari situs perbandingan harga di indonesia, oke langsung saja yukk, mari kita simak berikut Spesifikasi dan Harga Laptop Ram 4GB Termurah.

Harga Laptop Ram 4GB Termurah

Harga Laptop Ram 4GB

Lenovo IdeaPad S210t-2961Processor Intel Pentium 1.8 GHz, Harddisk 500 GB, Ram 4 GB, Layar 11.6 inch.Rp 2,999,000
Toshiba Satellite C55D-A5380Processor AMD E-Series 1.4 GHz, Harddisk 500 GB, Ram 4 GB, Layar 15.6 inchRp 3,200,000
HP Pavilion 14-G006AUProcessor AMD E-Series 1.35 GHz, Harddisk 500 GB, Ram 4 GB, Layar 14 inchRp 3,390,000
Acer Aspire E3-112M-C6FJProcessor Intel Celeron 2.16 GHz, Harddisk 500 GB, Ram 4 GB, Layar 11.6 inchRp 3,420,000
Asus X453MA-WX428DProcessor Intel Celeron 2.16 GHz, Harddisk 500 GB, Ram 4 GB, Layar 14 inchRp 3,539,000
Asus X451CA-WX126DProcessor Intel Core i3 1.8 GHz, Harddisk 500 GB, Ram 4 GB, Layar 14 inchRp 3,785,000
Asus A46CA-WX083DProcessor Intel Celeron 1.5 GHz, Harddisk 500 GB, Ram 4 GB, Layar 14 inchRp 4,018,000
Dell Inspiron 14-N3442 | 3558UProcessor Intel Pentium 1.7 GHz, Harddisk 500 GB, Ram 4 GB, Layar 14 inchRp 4,200,000
 Lenovo ThinkPad T420-5ZAProcessor Intel Core i5 2.5 GHz, Harddisk 500 GB, Ram 4 GB, Layar 14 inchRp 4,500,000
Asus Vivobook S200E Intel Core i3 3217UM-1.8Ghz, Ram 4GB, Harddisk 500GB,  Layar 11.6 Inci, Windows 8Rp 6,103,000


Jangan Lupa, Baca Juga :
Harga Laptop Asus UX305
Harga Laptop Lenovo Ideapad S300

Bisa dilihat, Ram 4GB memang memiliki kinerja yang sangat cepat dibanding dengan Ram yang masih berukuran 2gb, tapi bagi sobat yang ingin memiliki laptop ram berukuran 2gb namun ingin memiliki ram berukuran 4gb, tenang saja, sobat bisa menambahkannya, dan untuk informasi lebih detail tentang penambahan ram pada laptop, sobat dapat langsung pergi ke tempat/toko laptop.

Nah perlu sobat ketahui juga, harga laptop diatas, dapat sewaktu-waktu berubah sesuai dengan kondisi dan daerah tempat tinggal sobat masing-masing, tapi sobat tidak perlu khawatir karena harga laptop ram 4gb diatas tidak terlalu jauh berbeda dengan harga laptop ram 4gb di daerah sobat. Oke mungkin hanya sekian informasi harga laptop yang dapat kami sampaikan, semoga bermanfaat dan terima kasih.