Rabu, 30 September 2015

Android Studio 1.4

Posted by, Jamal Eason, Product Manager, Android


Today we are releasing the 1.4 update to the Android Studio stable release channel. Most of the work and enhancements for Android Studio 1.4 are under the hood. However we have a handful of new features that we hope you enjoy and integrate into your workflow.


Note that some of new features (e.g. vector assets) require you to use Gradle Plugin 1.4 for your app project. The beta version of the Gradle plugin (1.4.0-beta3 ) is available today on jcenter with the final version coming in the next few weeks.


New Features in Android Studio 1.4


Design Tools


  • Vector Assets

    Starting with API 21, you can use Vector Drawables for image assets. For most apps, using VectorDrawables decreases the amount of density dependent drawables you need to maintain, and will also give you sharp image assets regardless of the screen device densities your app supports.


    With Android Studio 1.4, we are making the process of importing SVG images or Material icons much easier. If you update your Gradle Android plugin to 1.4.0-beta3 (or higher) in the project structure dialogue or your project build.gradle file ( 'com.android.tools.build:gradle:1.4.0-beta3'
    ), you can now use the new Vector Asset Studio by right-clicking the res/drawable folder in your project and selecting New → Vector Asset from the content menu.


    We are also excited to offer backwards compatibility for your vector assets in Android Studio 1.4. Once you have a vectorDrawable image in your res/drawable, the Gradle plugin will automatically generate raster PNG images for API level 20 and below during build time. This means you only need to update and maintain your vector asset for your app project and Android Studio can take care of image conversion process. Note, it is still best practice to create density dependent launcher icons in your res/mipmap folder. Learn more by watching the DevByte video on the new Vector Asset Studio tool.


  • Theme Editor

    We understand that managing your app theme and style can be a bit complex. With Android Studio 1.4, we are releasing a preview of the Theme Editor to help with this task. This first version of the Theme Editor is focused on editing and updating the material theme colors (colors.xml) in your app project. In future releases, we will cover more attributes of your app theme and styles files. To access the editor, navigate from top level menu Tools → Android → Theme Editor.


  • Project Templates

    We know many of you use the New Project Wizard app templates to start a new app project or to quickly add an activity to an existing app. To help with the visual design of your apps, we updated the app templates to include the Android Design Support Library alongside the AppCompat Support library.


    From the template wizard you can start projects with a basic blank template with a floating action button or start from a range of user interface components such as the navigation drawer, or AppBar with scrolling view. We also re-introduced the empty app template for those who want minimum code generation when adding an activity to your project.


    With Android Studio 1.4, you can also validate your apps on the new Nexus 5X and Nexus 6P screen sizes.


Performance Monitors


  • GPU Rendering Monitor

    Now it is possible to quickly inspect the GPU rendering performance of your app. To enable GPU monitoring, make sure you turn on monitoring for your Android hardware device or emulator under Setting → Developer Options → Profile GPU rendering → In adb shell dumpsys gfxinfo . To learn more about the GPU rendering results, check out the developer documentation.


  • Network Monitor

    With Android Studio 1.4, you can also monitor the network usage of your app. With the monitor you can track the transmit and receive rates of your app over time.


Developer Services


  • Firebase

    It is now even easier to add a Firebase mobile backend to your Android app. Firebase includes data storage, user authentication, static hosting, and more. To access the feature, navigate from the top level menu and select File → Project Structure → Cloud. Learn more about Firebase in this tutorial.


Whats Next


For current developers on Android Studio, you can check for updates from the navigation menu (Help → Check for Update [Windows/Linux] , Android Studio → Check for Updates [OS X]) . For new users, you can learn more about Android Studio on the product overview page or download the stable version from the Android Studio download site.


We welcome feedback on how we can help you. Connect with the Android developer tools team on Google+.

Selasa, 29 September 2015

Android 6.0 Marshmallow coming to devices soon

Posted by, Dave Burke, VP of Engineering, Android


Starting next week, Android 6.0 Marshmallow will begin rolling out to supported Nexus devices around the world, including Nexus 5, Nexus 6, Nexus 7 (2013), Nexus 9, Nexus Player, and Android One. At the same time, we’ll be pushing the Android 6.0 source to the Android Open Source Project (AOSP), which marks the official beginning of public availability.


Today we also introduced two great new Nexus devices that will be among the first to run the Android 6.0 Marshmallow platform. These devices let your apps use the latest platform features and take advantage of the latest hardware optimizations from our partners. Let’s take a look at how to make sure your apps look great on these new devices.


Introducing Nexus 5X and Nexus 6P


Nexus 5X


Nexus 6P


The Nexus 5X is built in partnership with LG. It’s equipped with a 5.2-inch FHD LCD 1080p display, a Snapdragon™ 808 processor (1.8 GHz hexa-core, 64-bit), and a 12.3 MP rear camera. Offering top-line performance in a compact, lightweight device.


The Nexus 6P, built in partnership with Huawei, has a 5.7-inch WQHD AMOLED display, Snapdragon™ 810 v2.1 processor (2.0 GHz octa-core 64-bit), front-facing stereo speakers, and a 12.3 MP rear camera, all housed in a diamond-cut aluminum body.


Both devices have USB Type-C ports and fingerprint sensors, and include the latest hardware features for Android, such as: Android Sensor Hub, low-power Wi-Fi scanning with channel selection, batching, and BSSID hotlists, Bluetooth 4.2 with ultra low-power BLE notifications, and more.


Get your apps ready


Take some time to make sure your apps and games are ready to give your users the best mobile experience on these devices.


Check your assets


Resolution Screen size Density
Nexus 5X 1920 x 1080 px
(730 x 410 dp)
normal 420 dpi
Nexus 6P 2560 x 1440 px
(730 x 410 dp)
normal 560 dpi


Nexus 5X has a quantized density of 420 dpi, which falls in between the xhdpi and xxhdpi primary density buckets. Nexus 6P has a density of 560 dpi, which falls in between the xxhdpi and xxxhdpi buckets. The platform will scale down any assets from a higher resolution bucket, but if those aren’t available, then it will scale up the assets from a lower-density bucket.


For best appearance in the launcher, we recommend that you provide at least an xxxhdpi app icon because devices can display large app icons on the launcher.


For the rest of your assets, you can consider using vector assets or optionally add versions for the next-higher density bucket. This provides a sharper visual experience, but does increase apk size, so you should make an appropriate decision for your app.


Make sure you are not filtered on Google Play


If you are using the <compatible-screens>: element in your AndroidManifest.xml file, you should stop using it because it’s not scalable to re-compile and publish your app each time new devices come out. If you must use it, make sure to update your manifest to add a new configuration for Nexus 5X, since it uses a new density bucket (420). Otherwise, your app may be filtered from Google Play on these devices.


Wrapping up M Developer Preview


After three preview releases, and with the final OTA coming soon, it’s time to wrap up the Android M Developer Preview. The feedback you’ve provided has helped make Android 6.0 a great platform for apps and games. Developers in more than 200 countries have been using the Developer Preview to get their apps ready for Android 6.0 Marshmallow users everywhere.


More developer resources


If you haven’t taken a look at Android 6.0 Marshmallow yet, visit developer.android.com/mm for complete information about about what’s new for developers and important changes to plan for in your apps — runtime permissions, Doze and App Standby idle modes, Auto Backup for Apps, fingerprint support, and others.


We’ve also produced a playlist of developer videos to help you get the most out of all the new features in Android 6.0 Marshmallow. Check it out below.


Final testing and updates


Now is the time to finish up testing and prepare for publishing. You can use the Developer Preview 3 system images for final testing until early October. After the Android 6.0 public release, you’ll be able to download final images from the Nexus factory images page, and final emulator images from Android Studio.


Reminder: Devices flashed with an M Developer Preview build won’t receive the Android 6.0 update automatically. You’ll need to manually flash those devices to a public released image first.


Upload your apps to Google Play


When your apps are ready, you can update them to Google Play via the Developer Console on all release channels (Alpha, Beta & Production). For apps that target API level 23, Google Play will provide the new optimized download and autoupdate flow based on the runtime permissions model in Android 6.0. Give it a try!


To make sure that your updated app runs well on Android 6.0 Marshmallow and older versions, we recommend that you use the newly improved beta testing feature on Google Play to get early feedback. You can then do a staged rollout as you release the new version to all users.


What’s next?


In mid-October, we’ll be turning down the M Developer Preview community and the M Developer Preview issue tracker. If you've filed bugs against the preview, and you'd like to keep these open against the Android 6.0 final builds, you can file a new issue in the AOSP issue tracker.


Thanks to everyone who participated in the Android M Developer Preview. Let us know how this year’s preview met your needs by taking a short survey. Your feedback helps shape our future releases.


Senin, 28 September 2015

Daftar Laptop Asus Harga 6 Jutaan Terbaru 2016

Laptop Asus Harga 6 Jutaan - Daftar Laptop Asus Harga 6 Jutaan Terbaru 2016 - Nah setelah kemarin kita telah membahas daftar harga laptop asus dengan harga 4 jutaan hingga harga laptop asus 5 jutaan, Pada kesempatan kali ini saya akan membahas seputar daftar harga laptop asus harga 6 jutaan, yang mungkin bisa berguna buat anda dan bisa menjadikan referensi anda dalam membeli sebuah laptop asus yang berkualitas.

Spesifikasi pada laptop asus harga 6 jutaan ini mungkin sudah tidak diragukan lagi, pasalnya telah banyak produk asus dengan harga 6 jutaan yang menggunakan processor intel core i3 ataupun intel core i5, dan juga ukuran ram pada daftar harga laptop asus 6 jutaan ini terbilang cukup besar, sekitar 2-8gb ram ddr3, Mungkin dengan ukuran ram 2 GB sampai 8GB sangat dapat memenuhi kebutuhan aktifitas online anda sehari-hari.

Daftar Laptop Asus Harga 6 Jutaan


Laptop Asus Harga 6 Jutaan

Nah Pada desain laptop asus harga 6 jutaan juga cukup menarik, dengan model asus yang memiliki ciri khas tersendiri, dan juga perpaduan warna dan bentuk laptop asus menjadikan laptop asus semakin menarik perhatian para calon pelanggannya, Fitur-fitur pada laptop asus juga sangat beragam tentunya, dengan berbagai fitur tersebut bisa anda manfaatkan untuk membantu anda dalam tugas perkerjaan sehari-hari anda, seperti webcam, bluetooth, dan masih banyak lagi.

Tipe Laptop
Harga Laptop Asus
Asus H100TAM-DK022P
Rp 6,019,000
Asus P450LDV-WO317D
Rp 6,049,000
Asus EeeTop 2013IUKI-B071M
Rp 6,099,000
Asus Transformer Book TP300LD-DW102D
Rp 6,199,000
Asus VivoBook S300CA-C1040H
Rp 6,237,000
Asus Transformer Book TP300LD-DW102H
Rp 6,273,400
Asus A450LD-WX036D
Rp 6,299,000
Asus X550ZE-XX033D
Rp 6,330,000
Asus Pro PU301LA-RO116D 
Rp 6,399,000
Asus A46CB-WX024D 
Rp 6,543,000
Asus ZENBOOK UX32A-R3024H 
Rp 6,578,000
Asus Transformer Book TP300LD-DW010D 
Rp 6,599,000
Asus Eee PC VX6S-BLK040M Lamborghini 
Rp 6,600,000
Asus A455LB-WX001D 
Rp 6,699,000
Asus X450LD-WX025D
Rp 6,699,000
Asus A43SD-VX748D 
Rp 6,700,000 
Asus X551CA-HCL1201L 
Rp 6,803,600
Asus A451LB-WX077DRp 6,899,000
Asus VivoBook S300CA-C1041H Rp 6,908,000
Asus S46CB-WX004H Rp 6,787,000

Halaman : [1]  [2]  [3]  [4]  [5]

[6]  [7]  [8]  [9]  [10]

Nah daftar harga laptop asus diatas dapat sewaktu-waktu berubah tanpa ada pemberitahuan dari pihak hargalaptop99 dan perbedaan pada harga sesuai dengan daerah tempat tinggal anda masing-masing.
Oke mungkin hanya sedikit yang dapat saya sampaikan, semoga bermanfaat dan bisa menjadi bahan referensi anda dalam membeli suatu produk laptop asus dengan harga 6 jutaan, Terima kasih telah berkunjung dan membaca artikel kami yang berjudul, Daftar Harga Laptop Asus Harga 6 Jutaan.

Support for 100MB APKs on Google Play

Posted by Kobi Glick, Google Play team


Smartphones are powerful devices that can support diverse tasks from graphically intensive games to helping people get work done from anywhere. We understand that developers are challenged with delivering a delightful user experience that maximizes the hardware of the device, while also ensuring that their users can download, install, and open the app as quickly as possible. It’s a tough balance to strike, especially when you’re targeting diverse global audiences.


To support the growing number of developers who are building richer apps and games on Google Play, we are increasing the APK file size limit to 100MB from 50MB. This means developers can publish APKs up to 100MB in size, and users will see a warning only when the app exceeds the 100MB quota and makes use of Expansion Files. The default update setting for users will continue to be to auto-updating apps over Wi-Fi only, enabling users to access higher quality apps and games while conserving their data usage.


Even though you can make your app bigger, it doesn’t always mean you should. Remember to keep in mind the following factors:

  • Mobile data connectivity: Users around the world have varying mobile data connectivity speeds. Particularly in developing countries, many people are coming online with connections slower than those of users in countries like the U.S. and Japan. Users on a slow connection are less likely to install an app or game that is going to take a long time to download.

  • Mobile data caps: Many mobile networks around the world give users a limited number of MB that they can download each month without incurring additional charges. Users are often wary of downloading large files for fear of exceeding their limits.

  • App performance: Mobile devices have limited RAM and storage space. The larger your app or game, the slower it may run, particularly on older devices.

  • Install time: People want to start using your app or game as quickly as possible after tapping the install button. Longer wait times increase the risk they’ll give up.


We hope that, in certain circumstances, this file size increase is useful and enables you to build higher quality apps and games that users love.


Kamis, 24 September 2015

Android Development Patterns: A Series on Best Practices for Android Development

Posted by, Ian Lake, Developer Advocate


One of the benefits of Android development is the flexibility provided by the large number of APIs in the Android framework and Support Library, not even including the Google Play services APIs. However, that can be a lot to understand, particularly when confronted with multiple options or design decisions. Thankfully, things are about to get a lot clearer with a new series: Android Development Patterns.


The goal of Android Development Patterns is to focus on the fundamental components and best practices that can make the biggest difference in your app. We spend time talking about the why behind each API, so that you know exactly what is best for your situation.


Centered on Android framework APIs, the Android Support Library, and high level app structure and design, we’ll augment the many videos on the Android Developers YouTube channel to bring the focus back towards Android development at its core.


Android Development Patterns are more than just videos. You’ll find written pro-tips from in-house experts at Google, such as Joanna Smith and Ian Lake, every week through the Android Development Patterns Google+ Collection.


Watch all of Android Development Patterns!


Always-on Android Wear apps with the Google Maps API

Originally posted on the Geo Developers Blog


Posted by Ankur Kotwal, Developer Advocate


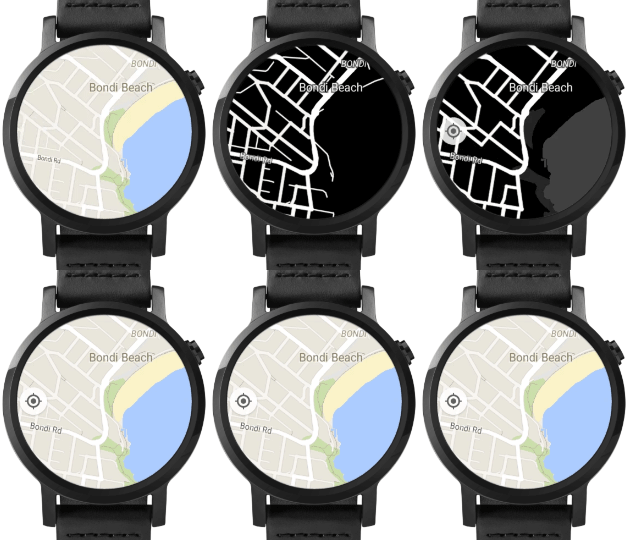
Some Android Wear apps are most useful when they are always available to the user, even at a glance. Now, with Google Play Services 8.1, the Google Maps Android API supports ambient mode, the API that provides always-on capabilities. In ambient mode, the map adjusts its style to provide a simplified, low-color rendering of the map. All markers, objects, and UI controls disappear, keeping the map on the screen while letting the user know that it is not currently ready to accept user input. An important advantage is the camera position and zoom level are retained, thus keeping the user’s context within the map.


The screenshot below show how maps appear in interactive mode and in ambient mode.


To implement ambient mode in your maps, follow these steps:


  1. Set your your targetSDKVersion to 22 or higher


  2. Add the following dependencies to build.gradle for your app to add the wearable support library.
     dependencies {
        compile 'com.google.android.support:wearable:1.2.0'
        provided 'com.google.android.wearable:wearable:1.0.0'
     }


  3. Add the wearable shared library entry into the wearable app manifest:
    <application>
      <uses-library android:name="com.google.android.wearable"
                    android:required="false" />
      ...
    </application>


  4. Add the WAKE_LOCK permission to the handheld and wearable app manifest:
    <uses-permission android:name="android.permission.WAKE_LOCK" />


  5. Have your Activity extend WearableActivity. This will provide the overrides that notify your app when the wearable enters, exits and provides screen updates in ambient mode.


  6. In the onCreate() method of your activity, call the setAmbientEnabled() method. This tells the framework that the app should enter ambient mode rather than returning to the watch face.


  7. Set your map to support ambient mode. You can do this by setting the attribute map:ambientEnabled="true"
in the activity's XML layout file, or programmatically by setting GoogleMapOptions.ambientEnabled(true). This informs the API to pre-load necessary map tiles for ambient mode.


  • When the activity switches to ambient mode, the system calls the onEnterAmbient() method in your wearable activity. Override onEnterAmbient() and call MapFragment.onEnterAmbient() or MapView.onEnterAmbient(). The map changes to a non-interactive, low-color rendering of the map.


  • When in ambient mode, your app can update the display every minute by overriding onUpdateAmbient(). If you need more frequent updates, check out this guide.


  • When the activity leaves ambient mode, the system calls the onExitAmbient() method in your wearable activity. Override onExitAmbient() and call MapFragment.onExitAmbient() or MapView.onExitAmbient(). The map returns to the normal rendering and is now ready to accept user input.


  • With always-on maps on Android Wear, you can now show maps at a glance. For more information on these APIs check out the documentation and the sample code.

    Google Play services 8.1: Get ready for Marshmallow!

    Posted by, Laurence Moroney, Developer Advocate


    With the rollout of Google Play services 8.1 finally finished, there’s a lot of new information to share with developers about the release!


    Marshmallow Permissions


    Android 6.0 (Marshmallow) has introduced a new permissions model allowing users to control app permissions at runtime. As an app developer, it’s important for you to adopt this and give your users good control over the permissions your app needs. You can find more details here.


    If your app is using Google Play services SDK versions prior to 8.1, you must update to use this new version to ensure your app is fully compatible with Android 6.0. This will enable you to manage the permission flows appropriately for your app and avoid any potential connection issues. For more details, and a step-by-step guide to what your app should do for the best user experience, take a look at this blog post on the Android Developers site.


    App Invites


    App Invites allows you to grow your apps audience by letting existing Android and iOS users invite their Google contacts via email or SMS to try your app out. Google Play services 8.1 adds the ability for developers to customize the email invitation, including adding a custom image, and specifying a call-to-action button text. These improvements should help developers increase user engagement and conversions with app invites.


    Ambient Mode Maps


    Android Wear provides a feature called ambient mode, enabling apps to stay visible, even when they aren’t actively being used. Now, with Google Play services 8.1, the Google Maps Android API supports ambient mode. In this mode, a simplified low-color rendering of the map will be seen. This reduces power consumption by lighting fewer pixels, but the camera and zoom level are retained, so user context will be kept. To learn more about ambient mode, check out this blog post.


    Nearby Status Listener


    Google Nearby allows you to build simple interactions between nearby devices. A new addition in Google Play services allows your app to receive callbacks when an active Nearby publish or subscribe expires. This frees you from tracking the TTL and allows your app's UI to accurately reflect whether Nearby is active or not.


    Play Games Player Stats API


    The new Play Games Player Stats API allows you to build better, smarter, games. It will let you tailor user experiences to specific segments of players and different stages of the player lifecycle. For example, you can give your most valuable players that are returning from a break in play a special welcome back message and reward.


    Breaking Changes


    In this release, there are some changes to GoogleApiClient and PendingResult, making them abstract classes, which may lead to breaking changes in your code. Learn more about these changes and how to handle them in the release notes.


    SDK Now available!


    You can get started developing today by downloading the Google Play services SDK from the Android SDK Manager. To learn more about Google Play services and the APIs available to you through it, visit our documentation on Google Developers.


    Google Play services 8.1 and Android 6.0 Permissions

    Posted by, Laurence Moroney, Developer Advocate


    Along with new platform features, Android 6.0 Marshmallow has a new permissions model that streamlines the app install and auto-update process. Google Play services 8.1 is the first release to support runtime permissions on devices running Android 6.0. and will obtain all the permissions it needs to support its APIs. As a result, your apps won’t normally need to request permissions to use them. However, if you update your apps to target API level 23, they will still need to check and request runtime permissions, as necessary.


    To update your Google Play services apps to handle the latest permissions model, it’s good practice to manage the user’s expectations in setting permissions that the runtime may require. Below are some best practices to help you get started.


    Before you begin...


    For the purposes of this post, ensure that your API level and Target SDK are set to at least 23. Additionally, ensure that, for backwards compatibility, you are using the V4 support library to verify and request permissions. If you don’t have it already, add it to your gradle file:


    com.android.support:support-v4:23.0.1


    You’ll also need to declare Permissions in your AndroidManifest.xml file. There’s no change here. Whatever permissions your app has always needed should be declared in your AndroidManifest.xml file with the uses-permission tag. Here’s an example:


    <uses-permission android:name="android.permission.ACCESS_FINE_LOCATION"/>


    Documentation on maps and location, including a walkthrough on connecting may be found here.


    Step 1. Manage Connections to the GoogleApiClient


    Make sure that you are handling connection failures on GoogleApiClient correctly, and that you are using the proper resolution process as outlined here. Note that if Google Play services itself is missing permissions, the user flow to fix them will be handled for you automatically if you follow this methodology.

    Here’s an example:


    @Override
    public void onConnectionFailed(ConnectionResult result) {
          if (mResolvingError) {
                 // Already attempting to resolve an error.
                 return;
          } else if (result.hasResolution()) {
                 try {
                       mResolvingError = true;
                       result.startResolutionForResult(this, REQUEST_RESOLVE_ERROR);
                 } catch (SendIntentException e) {
                       // There was an error with the resolution intent. Try again.
                       mGoogleApiClient.connect();
                 }
          } else {
                 // Show dialog using GooglePlayServicesUtil.getErrorDialog()
                 showErrorDialog(result.getErrorCode());
                 mResolvingError = true;
          }
    }


    Step 2. Verify Permissions before calling APIs


    It’s easy to assume that once you can connect, and you’ve declared the required permissions for APIs that you want to use in your AndroidManifest.xml file, that future calls will be fine. However, it is vital to ensure that you have the required permission before calling an API or connecting to the GoogleApiClient. This can be done using the checkSelfPermission method of ActivityCompat, Fragment or ContextCompat.


    If the call returns false, i.e. the permissions aren’t granted, you’ll use requestPermissions to request them. The response to this will be returned in a callback which you will see in the next step.


    Here’s an example:


    private static final int REQUEST_CODE_LOCATION = 2;
    
    if (ActivityCompat.checkSelfPermission(this, Manifest.permission.ACCESS_FINE_LOCATION)
                    != PackageManager.PERMISSION_GRANTED) {
     // Request missing location permission.
     ActivityCompat.requestPermissions(this, 
        new String[]{Manifest.permission.ACCESS_FINE_LOCATION}, 
        REQUEST_CODE_LOCATION);
    } else {
     // Location permission has been granted, continue as usual.
     Location myLocation = 
                 LocationServices.FusedLocationApi.getLastLocation(mGoogleApiClient);
    }


    Step 3. Implement the request permission callback.


    In step 2, if the permission wasn’t granted by the user, the requestPermissions method was called to ask the user to grant them. The response from the user is captured in the onRequestPermissionsResult callback. You need to implement this, and always check the return values because the request could be denied or cancelled. Note that you might need to request multiple permissions here -- this sample just checks for a single permission -- you may need to check for more.


    public void onRequestPermissionsResult(int requestCode, 
                                          String[] permissions,
                                          int[] grantResults) {
         if (requestCode == REQUEST_CODE_LOCATION) {
              if(grantResults.length == 1 
           && grantResults[0] == PackageManager.PERMISSION_GRANTED) {
              // success!
              Location myLocation =
                   LocationServices.FusedLocationApi.getLastLocation(mGoogleApiClient);
         } else {
         // Permission was denied or request was cancelled
         }
    }


    Step 4. Show permission rationale


    If the user has previously denied the permission request, your app should display an additional explanation before requesting the permission again. Indeed, if the permissions are non trivial for the core features of the app, and the user is confused as to why they are needed, it would be recommended to guide them.


    In this case, before the call to requestPermissions (step 2, above), you should call shouldShowRequestPermissionRationale, and if it returns true, you should create some UI to display additional context for the permission.


    As such your code from Step 2 might look like this:


    private static final int REQUEST_CODE_LOCATION = 2;
    
    if (ActivityCompat.checkSelfPermission(this, Manifest.permission.ACCESS_FINE_LOCATION)
                    != PackageManager.PERMISSION_GRANTED) {
     // Check Permissions Now
    
      if (ActivityCompat.shouldShowRequestPermissionRationale(this,
                    Manifest.permission.ACCESS_FINE_LOCATION)) {
            // Display UI and wait for user interaction
      } else {
     ActivityCompat.requestPermissions(
                 this, new String[]{Manifest.permission.ACCESS_FINE_LOCATION}, 
                                         REQUEST_CODE_LOCATION);
      }
    } else {
         // permission has been granted, continue as usual
         Location myLocation = 
            LocationServices.FusedLocationApi.getLastLocation(mGoogleApiClient);
    }


    Note that in this case your user may still deny the permissions, in which case you will need to craft your app so as not to be in a situation where a denied permission affects parts of the app where it shouldn’t. Refer to the best practices section on the Android developer’s site for more details and guidance.


    If you’ve built any applications that use Google Play services, I’d recommend that you download the Google Play services 8.1 SDK, and rebuild your applications using it, testing against the most recent versions of Android 6.0, which you can download from the Android Developers site.


    Useful resources:


    Get started with building for Android 6.0


    Android Permissions design guidelines


    Google IO 2015 Session on Android M Permissions


    Samples for Google Play services 8.1 with coding best practices


    Rabu, 23 September 2015

    BLACK BERRY ID RESET KATA SANDI / ATUR ULANG PASSWORD BB ID

    Blackberry ID reset kata sandi / atur ulang password BB id tentunya dapat di jadikan sebagai upaya alternatip guna mengatasi sekaligus menjadi  solusi yang mungkin dapat membantu untuk memecahkan masalah khususnya ketika anda  tidak bisa masuk alias logn in ke blackberry id di perangkat blackberry atau mungkin mengalami lupa kata sandi / password bb id.

    Sebagaimana yang telah saya uraikan sebelumnya lewat artikel akun blackberry id tidak bisa logn in atau masuk pada dasarnya hanya di sebabkan oleh beberapa faktor,namun di sini saya tidak akan menjelaskan mengenai faktor-faktor tersebut melainkan lebih kepada bagaimana cara reset blackberry id atau atur ulang kata sandi/password blackberry id.
     
    Mengatur ulang kata sandi blackberry id akan menjadi sebuah alternatif paling epesien guna mengatasi jikalau akun blackberry id kita khususnya di perangkat blackberry mengalami kendala atau kesulitan masuk yang pada umumnya di sebabkan oleh karen kita lupa akan kata sandinya.

    Untuk lebih jelasnya silahkan saja ikuti beberapa langkah yang wajib anda lakukan berikut di bawah ini

    blackberry id reset
    Blackberry ID Reset


    1.  Silahkan anda kuncungi situs resminya blackberry id reset kata sandi di SINI

    2  .Pada kolom Username masukan alamat email yang di gunakan sebagai akun id blackberry id anda kemudian masukan beberapa angka yang di berikan setelah itu klik Submit


    blackberry id reset


    3. Selanjutnya pada kolom Answer masukan jawaban yang pernah anda buat pada saat anda bikin akun id blackberry id dulu,misalnya dalam contoh waktu itu saya membuat pertanyaan untuk blackberry id saya yaitu berapa no hp anda dan tentu jawaban yang saya buat yaitu 00, maka dalam answer tersebut saya masukan kembali angka 00 tersebut lalu klik OK


    blackberry id reset

    4.  Kemudian selanjutnya kli OK

    blackberry id reset

    5. Sampai tahap ini secara otomatis anda akan di arahkan menuju alamat email yang di gunakan untuk blackberry id  tersebut pastinya anda perhatikan di kotak inbox email masuk anda, maka akan terlihat sebuah pesan yang di kirimkan oleh RIM blackberry dan klik link itu. Lihat gambar di bawah


    blackberry id reset

    6. Klik Change your Blackberry ID password


    blackberry id reset

    7.  Pada tahap ini anda kembali di minta untuk memasukan kembali jawaban yang sama seperti tadi sebelumnya, terus di kolom New Password/kata sandi baru yah di isi dengan kata sandi yang baru begitu juga pada kolom Confirm Password lalu setelah itu klik Submite


    blackberry id reset

    8.  Selanjutnya anda tunggu sebentar sampai terbuka pesan sebagai berikut. Lihat gambar di bawah


    blackberry id reset

    9.  Dan sekarang coba anda perhatikan pada gambar di bawah ini, artinya bahwa pengaturan ulang kata sandi blackberry id anda telah sukses  dan sudah bisa kembali membuka akun blackberry id anda yang sebelumnya telah lupa akan kata sandinya jika sudah klik Done


    blackberry id reset

    Demikianlah tutorial singkat tentang blackberry id reset kata sandi / atur ulang kata password bb id semoga bermanfa'at dan dapat membantu.

    Baca juga Cara memnuat akun google play store baru di android

    Senin, 21 September 2015

    Introducing Android Developer Nanodegree in India with Udacity—1000 scholarships available

    Originally posted on the Google India blog


    Posted by Peter Lubbers, Senior Program Manager, Google


    With a vision to transform India into a hub of high-quality mobile developers for global and local apps, we’re delighted to announce the launch of a program to offer Android Developer Nanodegrees in India in partnership with Udacity. The Android Nanodegree is an education credential that is designed to help developers learn new skills and advance their careers in a few months—from anywhere on any device—at their own pace.


    The Udacity Android Nanodegree program comprises of courses developed and taught by expert Google instructors from the Google Developer Relations team and will include project reviews, mentorship and career services from Udacity. The curriculum will be updated regularly with new releases and will provide developers with a certificate that will help them to be a more marketable Android developer.


    With 3 million software developers, India is already the second largest developer population in the world, but we still lag behind in creating world-class apps. With the launch of this program we want to bridge the gap by providing India’s developer community with an easy way to learn and build high quality apps for the world. Today, only less than 2% of apps built in India feature in top 1000 apps globally and our goal is to raise this to 10% in next three years.


    The Udacity Android Nanodegree program is open for enrollment from today. The program takes an average of 6-9 months to complete and costs Rs. 9,800 per month with Udacity refunding 50 percent of the tuition upon completion. Google and Tata Trusts have partnered to give 1000 scholarships for the Android Nanodegree to deserving students and will be available from today. Interesting applicants can visit https://www.udacity.com/india for more information.


    Speaking about their association with the Android Nanodegree program, Mr. Venkat - Managing Director of Tata Trusts said, “India has one of the youngest population of developers, where the average age of a developer is just 25 years old. While the last decade has established India as the largest provider of a skilled IT workforce to the world, there is an opportunity to help our young developers and equip them to compete on a global stage through educational and skill building programs. As part of our association, we’re glad to announce 500 free scholarships for the complete Android Nanodegree."

    Jumat, 18 September 2015

    AKUN COC | CARA MEMBUAT AKUN BARU GAME COC DI ANDROID

    Akun COC / cara membuat akun baru game COC di android coc yaitu singkatan dari clesh of clen di mana clash of clen ini merupakan  sebuah nama game yang cukup populer saat ini serta banyak di sukai  oleh banyak kalangan baik secara online maupun offline.

    Permainan sejenis coc selain  mudah sekali di mainkan juga sangat mudah di dapatkan atau di download melalui paitur google play store pada perangkat smartphone yang sudah di dukung dengan sistem operasi android.

    Adapun mengenai bagaimana cara menggunakan atau menjalankan  aplikasi game coc tersebut tentunya kita harus membuat akun coc terlebih dahulu, dan yang pasti untuk proses buat akunyapun bisa di bilang sangat mudah 

    Oleh karena itu lewat artikel singkat kali ini saya akan mencoba untuk memberikan panduan dalam hal bagaimana cara membuat akun baru game coc di android khususnya bagi mereka yang masih belum paham atau bisa buat akun coc tersebut.

    Silahkan ikuti langkah-langkahnya berikut di bawah ini :

    Cara Membuat Akun Baru Game Coc Di Android


    akun coc
    Buat Akun COC Baru Di Android


    1. Download dan Install aplikasi clash of clans di perangkat android anda lewat googleplay store

    2. Buka aplikasi game COC ( clash of clans ) pada layar smartphone android anda

    3.Tunggu sampai loading game selesai

    akun coc

    4. Selanjutnya klik Okay

    akun coc


    5. Langkah berikutnya klik Sign In di pojok kana atas

    akun coc

    6. Tahap selanjutnya pilih jenis kelamin

    akun coc

    7. Selanjutnya klik Buat

    akun coc

    8. Kemudian pada langkah seterusnya klik Masuk

    akun coc

    Sampai tahap ini selesailah sudah cara membuat akun baru coc game di android anda,artinya sejak saat itu pula bahwa aplikasi game COC / Clash OF Clans sudah dapat di opresakan.

    Selamat mencoba...!

    Kamis, 17 September 2015

    Telltale Games share their tips for success on Android TV

    Lily Sheringham, Developer Marketing at Google Play


    Editor’s note: This is another post in our series featuring tips from developers finding success on Google Play. This week, we’re sharing advice from Telltale Games on how to create a successful game on Android TV. -Ed.


    With new Android hardware being released from the likes of Sony, Sharp, and Philips amongst others, Android TV and Google Play can help you bring your game to users right in their living rooms through a big screen experience.


    The recent Marshmallow update for Android TV means makes it easier than ever to extend your new or existing games and apps for TV. It's important to understand how your game is presented in the user interface and how it can help users get to the content they want quickly.


    Telltale Games is a US-founded game developer and publisher, based in San Francisco, California. They’re well known for the popular series ‘The Walking Dead’ and ‘Game of Thrones‘ which was created in partnership with HBO.


    Zac Litton, VP of Technology at Telltale Games, shares his tips for creating and launching your games with Android TV.


    Tips for launching successful games on Android TV


    1. Determine the Device for Android TV: Determine what device your game is running on by using the UiModeManager.getCurrentModeType() method. If the device is running in television mode, you can declare what to display as the launch point of the game on the Android TV itself (Configuration). Add the LEANBACK_LAUNCHER filter category to one of your intent-filters to identify your game as being enabled for TV. This is required for your game to be considered a TV app in Google Play.


    2. Touchscreen vs TV: TVs don’t have touch screens so make sure you set the touchscreen required flag to false in the manifest as touch is implicitly true by default on Android. This will help avoid your game getting filtered from the TV Play store right out of the gate. Also, check your permissions, as some imply hardware requirements which you may need to override explicitly.


    3. Use Hardware APIs: Use the package manager which has System Feature API to enable your game to reason about what capabilities it can and should expose. For example, whether to show the user touch screen controls or game controller controls. You can also make your app location aware using the location APIs available in Google Play services to add location awareness with automated location tracking, geofencing, and activity recognition.


    4. Use appropriate controllers: To reach the most users, your app should support a simplified input scheme that doesn’t require a directional pad (D-pad controller). The player needs to be able to use a D-Pad in all aspects of the game—not just controlling core gameplay, but also navigating menus and ads, therefore your Android TV game shouldn’t refer to a touch interface specifically. For example, an Android TV game should not tell a player to "Tap here to continue."


    5. Appear in the right place: Make sure you add an android:isGame attribute to the application element of the manifest and set it to true in order to enable the installed game to show up on the correct launcher row, games.


    6. Provide home screen banners: Provide a home screen banner for each localization supported, especially if you are an international developer. The banner (320 x 180) is the game launch point that appears on the TV home screen on the games row.


    7. Use a TV image for your Store Listing: Be sure you provide at least one TV screen shot on your Store Listing page. Then include a high res icon, feature graphic, promo graphic and TV banner.


    8. Improve visibility through ‘search’ and ‘recommendations’: Android TV uses the Android search interface to retrieve content data from installed apps and games, and deliver search results to the user. Implement a ContentProvider to show instant suggestions to the user, and a SearchManager to deep link your game’s content.


    9. Set appropriate pricing and distribution: Check “Distribute to Android TV” in the relevant section in the Developer Console. This will trigger a review by Google to ensure your game meets the minimum requirements for TV.


    10. Guide the user: Use a tutorial to guide the player into the game mechanics and provide an input reference to the user based on the input control they are using.


    With the recently released Android TV codelab and online class from Udacity, you can learn how to convert your existing mobile game into Android TV in just four hours. Find out more about how to build games for Android TV and how you to publish them using familiar tools and processes in Google Play.

    Selasa, 15 September 2015

    New Android Marshmallow sample apps

    Posted by Rich Hyndman, Developer Advocate


    Three new Android Marshmallow sample applications have gone live this week. As usual they are available directly from the Google Samples repository on GitHub or through the Android Studio samples browser.


    Android Direct Share Sample


    Direct Share is a new feature in Android Marshmallow that provides APIs to make sharing more intuitive and quick for users. Direct Share allows users to share content to targets, such as contacts, within other apps. For example, the direct share target might launch an activity in a social network app, which lets the user share content directly to a specific friend in that app.


    This sample is a dummy messaging app, and just like any other messaging apps, it receives intents for sharing a plain text. It demonstrates how to show some options directly in the list of share intent candidates. When a user shares some text from another app, this sample app will be listed as an option. Using the Direct Share feature, this app also shows some of contacts directly in the chooser dialog.


    To enable Direct Share, apps need to implement a Service extending ChooserTargetService. Override the method onGetChooserTargets() and return a list of Direct Share options.


    In your AndroidManifest.xml, add a meta-data tag in your Activity that receives the Intent. Specify android:name as android.service.chooser.chooser_target_service, and point the android:value to the Service.


    Android MidiSynth Sample


    Android 6.0 introduces new support for MIDI. This sample demonstrates how to use the MIDI API to receive and play MIDI messages coming from an attached input device (MIDI keyboard).


    The Android MIDI API (android.media.midi) allows developers to connect a MIDI device to an Android device and process MIDI messages coming from it.


    This sample demonstrates some basic features of the MIDI API, such as:

    • Enumeration of currently available devices (including name, vendor, capabilities, etc)

    • Notification when MIDI devices are plugged in or unplugged

    • Receiving and processing MIDI messages


    It also contains a simple implementation of an oscillator and note playback.


    Android MidiScope Sample


    A sample demonstrating how to use the MIDI API to receive and process MIDI signals coming from an attached device.


    The Android MIDI API (android.media.midi) allows developers to connect a MIDI device to Android and process MIDI signals coming from it. This sample demonstrates some basic features of the MIDI API, such as enumeration of currently available devices (Information includes name, vendor, capabilities, etc), notification when MIDI devices are plugged in or unplugged, and receiving MIDI signals. This sample simply shows all the received MIDI signals to the screen log and does not play any sound for them.


    Check out a sample today and jumpstart your Android Marshmallow development.


    Senin, 14 September 2015

    Android Developer Story: Domain increases installs by 44% with Material Design and Google Play services

    Posted by Lily Sheringham, Google Play team


    Australian developer Domain is part of a multi-platform property business, which provides search tools and information for buyers, sellers, renters, investors, and agents across Australia. The Domain Real Estate & Property app was voted a top five lifestyle app in Australia and now has three dedicated Android developers who work closely with their design and UX teams.


    Product Manager, Henrique Marassi, and Android Developer, Gary Lo, explain how Domain successfully improved their user rating from 2.8 to 4.1 and increased monthly downloads by 44 percent by adopting Material Design and Play services to create a better user experience.


    Learn more about how Domain found success on Google Play:

    • Material Design guidelines: How Material Design helps you create beautiful, engaging apps.

    • Google Play services: Learn more about Google Play services and the APIs available to you through it.

    • Find success on Google Play: Products and best practices to help your grow you business globally on Google Play.

    Sabtu, 12 September 2015

    CARA MENGAKTIFKAN GOOGLE PLAY STORE Di Android

    Cara mengaktifkan google play store di android pastinya sangat mudah dan gampang,jika kita memang sudah mahir serta paham banget namun akan lain ceritanya bagi seseorang yang masih baru menggunakan perangkat device os android yah dapat di pastikan masalahnya akan di rasa rumit bahkan sulit.

    Sebagai bukti mengapa saya mengatakan begitu...? karena tentunya berdasarkan atas catatan pencarian google yang saat ini sudah mulai banyak yang mencari tentang bagaimana cara mengaktifkan google play store tersebut.

    Sehubungan dengan hal itu makanya saya lewat artikel kali ini akan membagikan sedikit penjelasan seputar cara mengaktifkan google play store tersebut dengan harapan semoga tulisan singkat ini kiranya dapat menambah sedikit pengetahuan dan petunjuk khususnya untuk mereka yang belum mengetahui soal cara mengaktifkan google play store di android atau cara membuat akun google play store baru di android

    Untuk lebih singkatnya silahkan ikuti beberapa langkah yang harus di lakukan berikut di bawah ini :


    cara mengaktifkan google play store
    Cara Mengaktifkan Google Play Store


    1. Buka aplikasi google play storenya

    2. Jika sudah terbuka Klik Baru

    3. Di halaman Nama Anda masukan nama depan dan belakang anda jika sudah klik tanda segi tiga

    cara mengaktifkan google play store

    4. Di halaman Pilih nama pengguna masukan alamat email anda apabila sudah klik tanda segi tiga

    cara mengaktifkan google play store


    5. Jika ternyata nama pengguna tidak tersedia maka anda harus klik tanda panah kecil untuk melihat nama yang di sarankan dan nanti akan muncul beberapa pilihan nama yang di berikan, anda pilih salah satunya lalu klik coba lagi

    cara mengaktifkan google play store


    6. Kemudian selanjutnya pada halaman Buat Sandi, masukan kata sandi minimal enam hurup jika sudah klik tanda segi tiga

    7. Di halaman informasi pemulihan anda klik tanda panah kecil depan tulisan pilih pertanyaan keamanan dan pilih pertanyaan no telepon pertama serta isi kolom jawaban dengan angka 00 lalu klik kembali tanda segi tiga

    cara mengaktifkan google play store


    8. Di halaman Tuntaskan akun klik tanda segi tiga

    9. Di halaman mengautentukasi masukan beberapa capta yang di berikan pada kolom kecil di bawahnya setelah itu klik kembali tanda segi tiganya

    cara mengaktifkan google play store


    10. Selanjutnya pada halaman Hiburan klik Jangan sekarang

    11. Di jendela pencadangan dan pemulihan cukup klik tanda segi tiga 

    12. Tunggu sebentar sampai muncul pesan berikut lihat gambar di bawah dan klik Terima

    cara mengaktifkan google play store

    13. Yang terakhir anda tunggu beberapa menit saja sampai terbuka halaman awal dari google play store yang baru saja di aktifkan


    Nah begitulah sobat cara mengaktifkan goole play store di android...gampang bukan..?

    Rabu, 09 September 2015

    New permissions requirements for Android TV

    Posted by Anirudh Dewani, Developer Advocate


    Android 6.0 introduces a new runtime permission model that gives users more granular control over granting permissions requested from their apps and leads to faster app installs. Users can also revoke these permissions from Settings at any point of time. If an app running on the M Preview supports the new permissions model, the user does not have to grant any permissions when they install or upgrade the app. Developers should check for permissions that require runtime grant from users, and request them if the app doesn’t already have them.


    To list all permissions that require runtime grant from users on Android 6.0 -


    adb shell pm list permissions -g -d 


    RECORD_AUDIO


    Apps should generally request as few permissions as possible. Voice search is an integral part of Android TV content discovery experience. When using the internal SpeechRecognizer to enable Voice Search, apps must declare RECORD_AUDIO permission in the manifest. RECORD_AUDIO requires explicit user grant during runtime in Android 6.0. When using the Android TV Leanback support library, apps can eliminate the need for requesting RECORD_AUDIO during runtime by using SpeechRecognitionCallback instead of SpeechRecognizer.


    SearchActivity.java


    Commit from Android TV Leanback Sample repository.


    mFragment = (SearchFragment) getFragmentManager()
                    .findFragmentById(R.id.search_fragment);
    
    if (!USE_INTERNAL_SPEECH_RECOGNIZER) {
       
        mSpeechRecognitionCallback = new SpeechRecognitionCallback() {
            
            @Override
            public void recognizeSpeech() {
                if (DEBUG) Log.v(TAG, "recognizeSpeech");
            
                // ACTION_RECOGNIZE_SPEECH
                startActivityForResult(mFragment.getRecognizerIntent(), REQUEST_SPEECH);
            }
        };
        mFragment.setSpeechRecognitionCallback(mSpeechRecognitionCallback);
    }


    When SpeechRecognitionCallback is set, Android Leanback support library will let the your activity process the voice search action instead of using the internal SpeechRecognizer. The app can then use RecognizerIntent to support speech recognition.


    If you have an Android TV app targeting API Level 23, please update the app to use SpeechRecognitionCallback and remove RECORD_AUDIO permission from your manifest.

    Play Games Loot Drop for Developers

    Posted by Ben Frenkel, Product Manager Google Play Games


    Launched last March, Player Analytics is already becoming an important tool for many game developers, helping them to manage their games businesses and optimize in-game player behavior. Today we’re expanding Player Analytics with two new analytics reports that give you better visibility into time-based player activity and custom game events. We’re also introducing a new Player Stats API to let you tune your game experience for specific segments of players across the game lifecycle. Along with those, we’re rolling out a new version of our C++/iOS SDKs and Unity plug-in and giving you better tools to manage repeating Quests.


    New useful reports for developers


    We are launching two new reports later this week in the Play Games developer console: the Player Time Series Explorer and the Events Viewer. We’ve also made improvements to our player retention report.


    Player Time Series Explorer


    Ever wondered what your players are doing in the first few minutes of gameplay? What happens just before players spend or churn? The time-series explorer lets you understand what happens in these critical moments for your players.


    For example, you carefully built out the first set of experiences in your game, but are surprised by how many players never get through even the first set of challenges. With the Player Time Series Explorer, you can now see which challenges are impeding player progress most, and make targeted improvements to decrease the rate of churn. Learn more.


    Customize settings to explore player time series


    Select from a list of preset questions


    Find out what happens before your players spend for the first time


    Select “What happens before first spend” to see what happens just before your players spend for the first time. Time series are aligned by first spend event so you can easily explore what happened just before and after first purchase.


    Find out what happens before your players churn


    Select “What happens before churn” to see what happens before your players stop playing. In the example below, all the churn events are right aligned to make it easier to compare player time series.


    Hovering over events shows you additional details

    You can see more details for all event types by holding your cursor over the event’s shape. In this example, you can see that “Player 03” spent $4.99 after earning six achievements. Hovering over the achievement shapes will show you which specific achievements were earned.


    Events Viewer


    Now you can create your own reports based on your custom Play Games’ events. You can select multiple events to display and bookmark the report for easy access. Learn more.


    Here’s an example showing how a developer can compare the rates at which Players are entering contests, winning, and almost winning. This report would identify opportunities to improve the balance of its contest modes. You can then bookmark the settings so you can easily track improvements.


    28x28 day retention grid


    We added a 28-day-by-28-day retention grid to help you compare retention rates across a larger number of new user cohorts.


    Tailor player experiences with the Player Stats API


    Stats and reports give you insights into your what your players are doing, but wouldn’t it be nice to take action on those insights in your game? That’s what the Player Stats API is all about. The Player Stats API lets you tailor player experiences to specific segments of players across the game lifecycle. Player segments are based on player progression, spend, and engagement.


    Here are some examples of what you can do with Player Stats API:


    • For highly engaged players that just aren’t spending, you can show them special bonuses that are aimed at recruiting others to play instead of spending

    • For your most prolific spenders, you can provide occasional free gifts and upgrades

    • For users that haven’t found their stride in your game, you can show them a video that directs them to community features, like clan attacks or alliances, that drive deeper engagement

    • For players that have been away from the game for a while, you can give them a welcome back message that acknowledges impressive accomplishments, and award a badge designed to encourage return play


    The Player Stats API is launching in the next few weeks.


    C++/iOS SDK and Unity Plug-in updates


    iOS support for Play game services just got a lot better. This update includes improved CocoaPods support, which will make it easier to configure Play game services in Xcode. This also means you’ll have a much easier time building for iOS using the Unity plug-in as well.


    The latest build of the C++/iOS SDKs is now built on the new Google Sign-In framework, which adds support for authentication via multiple Google apps, including Gmail and YouTube. More importantly, if a player does not have any applicable Google apps installed, the Sign-In framework will bring up a webview within the app for authentication. Opening up a webview inside the app, instead of switching to a separate browser instance, makes for a much better user experience, and addresses a top developer request. For more on the new Google Sign-in library on iOS, check out this video. Learn more.


    Improved Quests


    Quests are a great way of engaging your players with new goals, and with this update we have made managing Quests easier with the introduction of repeating Quests. You can create Quests that run weekly or monthly by checking the repeating quest box. This will make it easier for you to engage your players with regularly occurring challenges. Repeating Quests will be launching in the next few weeks.


    If you have previously integrated Quests, you can easily convert them into repeating quests by following two easy steps.


    1. Go to Quests section of developer console, and open up an existing Quest. Click the copy Quest button at the top of the page


    2. Scroll down to the Schedule section of the Quest form, check the “Repeating quest” box, select between monthly and weekly quests under “Repeats”, and leave the “Ends:” field set to “Never”. After hitting save, you are done! From then on, the quest will run weekly or monthly until you decide to end it.


    Google Play game services (GPGS) docs and SDK downloads


    • GPGS overview: https://developers.google.com/games/services/?utm_campaign=cwag-voice-actions-94

    • Gettings started with GPGS guide: https://developers.google.com/games/services/console/enabling?utm_campaign=cwag-voice-actions-94

    • Downloads

      • Android, iOS, and C++ SDK

      • Unity Plugin